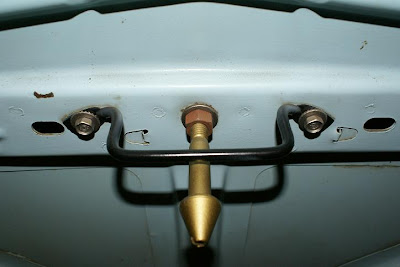


It is very common to see an otherwise beautiful car that has the hood sitting on it a little funny. Trying to adjust that can be very annoying if you aren't really sure what's making it do that. Fortunately, it's a very simple matter to correct. The second picture shows the hood latch stuff that's mounted on the hood itself. Remove that by loosening the nut that locks the hood stob into place, unscrew the hood stob and then remove the safety catch by removing the two bolts. Loosen the four bolts holding the hood onto the hinges a couple of turns, but DO NOT remove them. Close the hood very carefully, in case it has moved on you and could hit one of the fenders or the cowl panel and damage your paint. Once you have the hood stob and safety catch removed, the bolts loose and the hood closed, bump the hood around gently until it is sitting like it's supposed to, raise the hood very carefully, so that it doesn't shift on you, just high enough to get a half inch boxed end wrench on the front bolt of each hinge and snug them up enough to keep the hood from moving, raise the hood the rest of the way and tighten up the bolts. Be careful the first time that you raise the hood because it can look like you've got the perfect gap between the back edge of the hood and the cowl, but actually it's a little too close and the hood will hit the cowl on the way by as you open it and chip the paint. Also, be careful the first time that you close the hood after you tighten up the hinge bolts, because that might lower the back edge of the hood a little bit and, again, cause the hood to hit the cowl and chip the paint. Re-install the hood stob and safety catch.
Now that you have the hood sitting in the right spot, you need to make sure that the hood latch assembly, shown in the third picture, doesn't push the hood over to one side or the other when you close it, causing the hood to hit one of the fenders and, again, chip the paint. Loosen the bolts holding the hood latch to the hood latch bucket. On a 64 1/2 or a 65, there will be three bolts, on a 66 there will only be two. Lower the hood to where the hood stob is almost going into the hood latch and look to see if they are lined up correctly. The hood stob shouldn't be trying to push the hood latch one way or the other. Bump the hood latch around until it looks like the stob will go in without actually touching the latch at all, and then tighten up the bolts holding the latch. Close the hood carefully to make sure that nothing is hitting something else.
Now it's time to adjust the hood stob. With the hood fully closed and latched, the hood shouldn't be able to bounce up and down, but you also shouldn't be have to slam the hood closed to get it to latch. Screw the latch stob up or down as necessary to make this happen. You should be able to hold the latch release handle open with one hand, close the hood with the other, release the handle, and the hood is fully latched but won't move up or down when you try to wiggle it. Once you have the latch stob positioned like it needs to be for this to be the case, tighten up the lock nut on the latch stob.
In the first picture you see one of the two adjustable hood bumpers that control how far down the front of the hood is able to come. These are adjusted by loosening the nut, indicated by the red arrow, and then screwing the bumper up or down as necessary. When the hood is pressing lightly agianst the bumbers so that it can't go down any further, and the latch stob is fully latched, preventing it from moving up any further, but you didn't have to slam the hood shut to get it to 'catch' , that is how the hood is supposed to be at the front end.
If you look at the fourth picture, you will see that the hood is centered well, but is sitting up too high in the back. The fix for this is NOT to lean on the area until the hood goes down to flush with the fender. This is adjusted by opening the hood, loosening the three bolts holding the hinge to the car on both sides a couple of turns and pushing up on the front of the hood, causing the back of the hood to rotate downward. Be careful that the entire hinge doesn't drop down on you. How I do this is to leave the lower front bolt on each hinge sort of tight. I just kind of break it loose with the wrench, but leave it very snug. That way, the hinge rotates rather than drops. I normally use a telescoping hood prop to push the front of the hood up and hold it there, but I have found that a conveniently located friend works just as well. She holds the hood up while I snug the bolts back up. Close the hood carefully to make sure nothing hits anything and then tweek as needed, and then your hood sits in there perfectly.

No comments:
Post a Comment